Synopsis
The Squish IDE offers to right click on log entries of file based verification point (or image search) failures to inspect the differences between the "golden master" data (image, screenshot, table data, etc.) as it was captured in the past, and the data (image, screenshot, table data, etc.) fetched in the last test case execution.
By Using External Tools with the Squish IDE it is possible to implement custom work-flows which integrate external applications/tools into the Squish IDE, for example for implementing "custom", file based verification points, as shown in the example below.
Challenges
For ones own, custom "verification points", a number of challenges must be considered and resolved.
Challenge #1 - Representing "Actual" and "Expected" Data to be Verified in Text Format
To make comparing and storing the data, and viewing differences easy and flexible, the data to be verified should be in a simple text format.
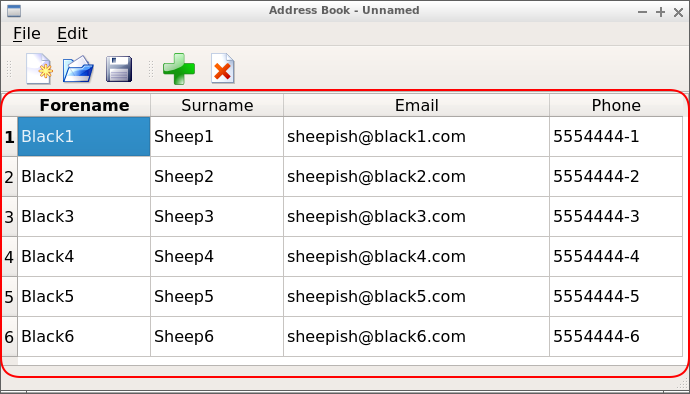
For example, the data in this table control...

...can be represented in text file with these contents:
Black1\tSheep1\tsheepish@black1.com\t5554444-1
Black2\tSheep2\tsheepish@black2.com\t5554444-2
Black3\tSheep3\tsheepish@black3.com\t5554444-3
Black4\tSheep4\tsheepish@black4.com\t5554444-4
Black5\tSheep5\tsheepish@black5.com\t5554444-5
Black6\tSheep6\tsheepish@black6.com\t5554444-6
...(each "\t" stands for a "tab character"), despite the fact that the data in the table could be something else but text based. What matters is whether we ourselves have an idea how to represent the data in the GUI control in text form.
Just to avoid confusion, the above text data looks like this (or similar) when shown in a normal text editor (when using a tab width of 4):
Black1    Sheep1    sheepish@black1.com    5554444-1
Black2    Sheep2    sheepish@black2.com    5554444-2
Black3    Sheep3    sheepish@black3.com    5554444-3
Black4    Sheep4    sheepish@black4.com    5554444-4
Black5    Sheep5    sheepish@black5.com    5554444-5
Black6    Sheep6    sheepish@black6.com    5554444-6
If the table had a first column that is actually a check box, the check box state could still be represented in text form, for example "checked" and "unchecked".
So this approach is not limited to verifying data that "is" text, instead anything that can be "represented" in text form is suitable, too.
Challenge #2 - Programmatically Comparing Expected and Actual Data
"Executing" a verification point means reading the "expected" data from an existing (or new) verification point file, and comparing it to the data in the GUI control, the "actual" data.
For this example we assume that script code exists that performs the desired comparison. In particular this example uses the script code in custom_file_vp_qtableview.py for performing (and logging the results of) the comparison, and also for writing the "results" of the (failed) comparison into a file ("failed" file).
This "failed" verification point file is required to allow human users to view the differences between the "failed" and "expected" data, as explained in the next section.
Challenge #3 - Tools for Diffing and Merging
A "diff" or "merge" tool must be used to "compare" the "failed" and the "expected" data files with one another. On Linux "Meld" is a good choice, and on Windows "WinMerge", but any other such tool is fine to use as well.
Challenge #4 - Integrating Diff/Merge Tool with Squish IDE
To make it convenient to view the differences of a failed verification point, and to accept the differences or adjust the "expected" data, it is desirable to let the Squish IDE open the diff/merge tool with the "failed" and "expected" data files for us (rather than browsing for the tool, manually opening the first file, then the other).
How to do add external tools to the Squish IDE in general is explained at Using External Tools with the Squish IDE .
For the custom verification points in this article, a little "helper" shell script called [View differences.vp_fail_txt](View differences.vp_fail_txt) needs to be registered as an "external tool" for the file type/file name extension *.vp_fail_txt.
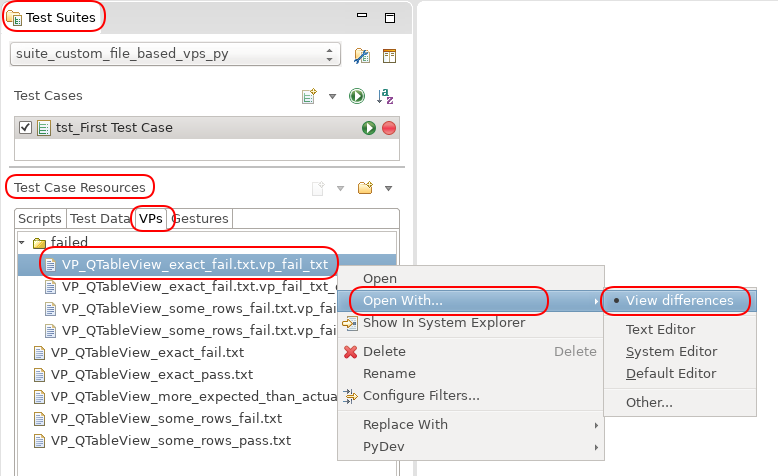
Once registered, *.vp_fail_txt files will have an entry View differences in their context menu in Open With....:

Setting Up Custom Verification Points
Step #1 - Add "editor" for custom fail file type *.vp_fail_txt
Register [View differences.vp_fail_txt](View differences.vp_fail_txt) as an "editor" for the new file type/association *.vp_fail_txt at Edit > Preferences > General > Editors > File Associations (as described in
Using External Tools with the Squish IDE
).
Step #2 - Enable View differences.vp_fail_txt
[View differences.vp_fail_txt](View differences.vp_fail_txt) uses the tool "Meld", so that must be installed, for example on Ubuntu or Debian Linux systems via this command:
sudo apt install meldCreating and using Custom Verification Points
Add and Execute Custom Verification Points
For example:
# -*- coding: utf-8 -*-

import names

# This is our module that contains the script code for our
# custom verification points; of the functions provided by
# it we only use test_vp_qtableview_exact() below:
#
from custom_file_vp_qtableview import test_vp_qtableview_exact


def main():
    startApplication("addressbook")
    clickButton(waitForObject(names.address_Book_New_QToolButton))
    add_dummy_entries()


    # Our newly added verification point:
    #
    # Note:
    #  The target file (test-case-dir/verificationPoints/VP_QTableView_exact_fail.txt)
    #  does not even exist yet. Instead, the function
    #  for executing the verification point
    #  (test_vp_qtableview_exact()) will create this
    #  file for us, if it does not exist yet.
    #
    qtv = waitForObject({"type": "QTableView", "visible": 1})
    test_vp_qtableview_exact(squishinfo.testCase + "/verificationPoints/VP_QTableView_exact_fail.txt", qtv)

[...]
After executing this, the (empty) VP file has been created and can be opened for viewing and editing at Test Suites view > Test Case Resources > VPs.
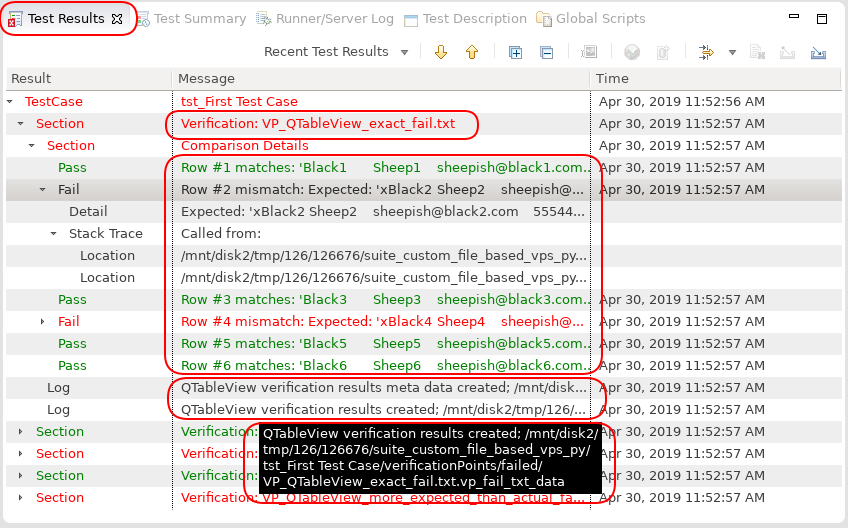
The log contains information about the failed verification:

Also, in Test Suites view > Test Case Resources > VPs > failed there is a file...
VP_QTableView_exact_fail.txt.vp_fail_txt
..., which is required for the next step.
Reviewing failed Verification Point Differences and Updating the "Expected" Data
In Test Suites view > Test Case Resources > VPs > failed open the file...
VP_QTableView_exact_fail.txt.vp_fail_txt
...via right mouse click > Open With... > View differences, or via double click.
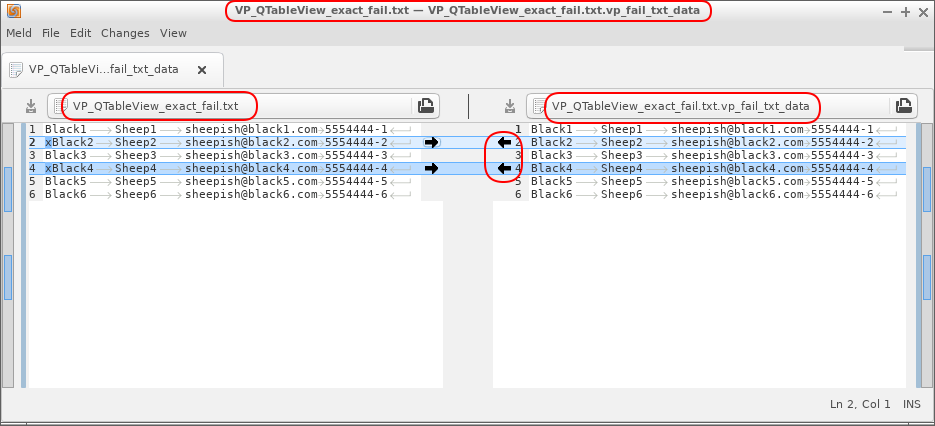
When opened, the helper shell script [View differences.vp_fail_txt](View differences.vp_fail_txt) will be used to open this file, which reads the file and eventually opens the files...
squishinfo.testCase + "/verificationPoints/VP_QTableView_exact_fail.txt"
...and...
squishinfo.testCase + "/verificationPoints/failed/VP_QTableView_exact_fail.txt.vp_fail_txt_data"
...in the "Meld" diff/merge tool:

At this point one can review and merge the differences, to update the "expected" data, if desired.
If the "expected" data file on the left is empty one can now easily merge all data from the "actual" data file on the right into the "expected" data file, to initialize the "expected" data file with the current data found in the table.
Example Test Suite
An example test suite for use with the Squish for Qt example SQUISH_DIR/examples/qt/addressbook can be downloaded here: suite_custom_file_based_vps_py.zip
Please note that the above mentioned setup steps are required for the integration of the "Meld" tool into the Squish IDE via [View differences.vp_fail_txt](View differences.vp_fail_txt), for viewing the differences of the verification point failures present in this test suite.